Solve the puzzle of the inverted pin
Materials
Assembly
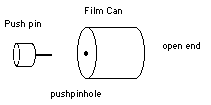
Remove the top from the film can.
Use the pushpin to make a pinhole near the center of the bottom of the film can. Spin the pin as you make the hole to make a clean circular hole. A pushpin will make a larger, more useful, hole than a common pin.

Investigation 1 The Inverted Pin Puzzle
To Do and Notice
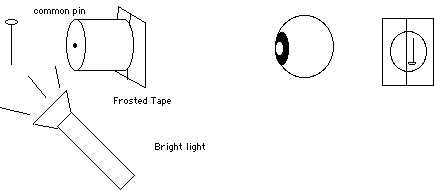
Push the pin from the inside through the middle of one of the curved sides of the filmcan. Look into the open end of the viewer and try to find an image of the pin by looking at a bright light through the pinhole. It may take some searching but you will see an inverted image of the pin in the pinhole.
Some questions that people ask when they see this:
Why does the image of the pin look inverted?
Why is there an image at all?
Why does it appear to be on the other side of the pinhole?
Try to figure these out for yourself before proceeding.

What you see
The following experiments might help you to form a theory of what is happening.
(If you cannot see the pin slide a 3x5 index card from the top down over the open end of the film can while you look at the pushpin hole at the far end. You will see a dark curtain rise up from the bottom!)
Film can Camera Obscura
Cover the open end of the film can with two pieces of frosted tape.
While standing in a darkened room, or in shade, point the bottom of the filmcan with its pinhole toward a brightly lit scene (For Example, look outdoors through a window). Look at the frosted tape end of the filmcan while holding it about a foot from your eyes.
You will see an inverted image of the scene on the frosted tape. You have made a pinhole camera, or a camera obscura.
Turn off all of the lights in a room except for two bare incandescent bulbs, one red and one green, which should be about a foot apart.
Point the bottom of the filmcan with its pinhole toward the lights observe the images of the lights with your camera obscura.
Notice how the pinhole images are reversed. The right lamp is imaged on the left side of the tape and vice-versa. Or, for color blind individuals, cover one of the lights with your finger and notice which image is blocked.

What you see
Investigate how the spacing between the images of the lamps depends on the distance between the pinhole and the lamps.
You can also examine a brightly lit pin with your film can camera obscura, if the room is dark.

What's going on
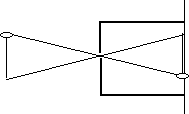
Light travels in straight lines. In particular, light travels in straight lines through the pinhole. So light that starts on the left of the pinhole passes through the hole and ends up on the right.

To make an image, all the light that leaves each point on the object (pin) and ends up on the tape must arrive at one point on the tape. A pinhole makes an image because all of the light that leaves one point on the pin and goes through the pinhole arrives at one point on the screen, (regardless of where the screen is.)
To really understand how pinholes work do the pinhole string exploration.
Look through a Pinhole
To Do and Notice
Remove the frosted tape from the bottom of the filmcan.
Turn on the roomlights or go outside.
Hold the open end of the filmcan in front of one of your eyes and close-to, or touching, your face.
Observe the world through the filmcan.
The world appears right-side-up.
Yet, when the tape was in place, the world appeared upside down .
Hold a pin outside the can, notice it appears right-side-up.
Put a pin back inside the can, then replace the tape. Point the pinhole at a bright light.
Observe the shadow of the pin on the tape.
(If you do not see the shadow move the film can closer to the bright light, or use a brighter light.)
Notice that the shadow is right-side-up.
What's Going On?
Notice that the pinhole image of the world is upside down on the tape, but you see the image of the world right-side-up when you look directly at the world with your own eye.
Notice that the shadow of the pin is rightside up on the tape, but you see it upside down.
This is because your brain flips over the image on your retina.
Pinhole magnifier
To Do and Notice
Make a pinhole in the lid of the filmcan and use it as a pinhole magnifier.
Look at this page through the pinhole. Move close to the page, so close that without the pinhole all the writing appears as a blur. Look through the pinhole and notice that the writing is clearly readable.
When you get very close the writing even appears magnified.
Remove your glasses if you wear them notice that the page is blurry then notice that you can still read the page through the pinhole.
What's going on
Even when the lens of your eye is incapable of making an image of the world on your retina, the pinhole can make an image.
You have little experience of seeing clear images of very close objects so that many people perceive these images to be magnified. (See the Pinhole Magnifier exhibit in the Exploratorium.)
A Bugbox model of your eye
To Do and Notice
The lens of your eye (I include the cornea and lens together when I say "the lens.") makes a real image of distant objects on your retina. The lens of your eye cannot make a real image of close objects. Try reading this page when it is only one finger-width from your eye. The letters will be blurry because they are too close to your eye to be imaged onto your retina.
You can use a small short focal length magnifying lens to make a model of your eye. A bug box lens is a perfect, inexpensive, lens to use.

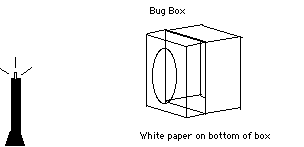
Place a piece of white paper inside the bottom of the bug box (or cover the bottom with frosted tape). Hold a minimag light with its front removed close to the lens of the bug box. There will be no image on the paper. Move the minimag light away from the bugbox, at some distance an image of the minimag light will appear on the paper. The bug box, like your eye cannot form an image of an object closer than some minimum distance.
Turn on a ceiling light. Separate the bug box lens from the box containing the paper screen. Hold the lens between the overhead light and the paper. Slowly move the lens away from the paper. At some distance an image of the overhead light will appear on the paper. Notice that the image is reversed both right-to left and up-to-down. This is a model for how an eye forms images.
While standing in a darkened room, or in shade, hold a piece of white paper so that one side faces a brightly lit outdoor scene. Start with the lens touching the paper. Slowly move the lens away from the paper. At some distance an image of the scene will appear on the paper. The image will be upside-down. At this point you might ask, if the image of the world on your retina is upside down, why do I see it right side up?
What's Going On?
Your cornea and lens makes an inverted and right-to-left reversed image on your retina.
Your brain inverts the image.
You perceive the image to be uninverted and unreversed.
Return to the pin and pinhole enigma
Begin by looking at a common pin held 25 or more cm (10 in.) from your eye, your eye-brain "sees" the pin right side up.

look at a pin you see an upright pin.
Hold the open end of your filmcan with the pushpin hole in the base in front of and close to your eye. Look through the pinhole at a common pin. You see the pin through the hole, it is right side up.

If you hold the pin close to the filmcan you can see it clearly. If you hold the pin in the same location and look at it without the filmcan it will be blurry. It is too close for your eye lens to form an image on your retina. The pinhole is forming the image on your retina.

you see
Look at the pin inside the film can.
 you
see
you
seeBright light coming through the pinhole makes a tiny source of light which casts a shadow of the pin on your retina. If you ignore the action of the lens of your eye, the shadow of the pin will be right-side-up on your retina. Your brain inverts this image as it does every image on your retina, so you see the shadow of the pin upside-down.
You can only see the shadow of the pin when it is in between the pinhole and your eye. The pinhole forms a window. Your eye and brain are used to windows and interprets the pin as being on the other side of the hole.
Putting the pinhole and the bug-box model of the eye together

Place a white paper onto a table. Darken the room and hold a small light (like the bulb from a minimag light) two feet above the paper. Make an image of the bulb on the paper using the lens alone then using the pinhole alone.
If you move the bulb back and forth notice that the images made by the lens and the pinhole both move opposite to the motion of the bulb. The images made by both the pinhole and by the lens are inverted.
The pinhole makes an image no matter where it is held, while the lens makes an image at only one position.
Now put the pinhole and the lens together. The bottom of the filmcan with the pinhole in it should touch the lens. (Note, the open end of a filmcan will slide into the open side of the top of a bug-box.)
The combined lens-pinhole will make an image. The image is inverted! The image is formed at all distances so the image is like the image formed by the pinhole more than it is like the image formed by the lens.
Making a shadow pin
Insert a common pin through the middle of one side of the filmcan. Place a small flashlight up against the pinhole. Hold the filmcan about 4" above a piece of white paper on a table with the open end down. Observe the shadow of the pin cast by the light from the flashlight coming through the pinhole. The shadow of the pin is not inverted.
Now place a lens over the open end of the film can. Observe the shadow of the pin with the lens in place. The shadow is still not inverted. Since the lens is acting like the lens of your eye this shows that the shadow of the pin which falls on your retina is not inverted.
Now hold the filmcan-flashlight two feet above the table. Observe the shadow of the pin on the table. Place the lens on the paper and slowly raise it. At some height an image of the shadow of the pin will appear. The shadow will be inverted. So whether a lens and a pinhole will invert an image once or twice depends on the distance between the pinhole and the lens.


A bright light casts a shadow of the pin in the can.
A lens near the pin does not invert this shadow.A lens moved far from the pin and the table too does invert the shadow.
Pinhole and lens revisited
Use a film can to make a pinhole image of a distant light bulb. Notice that the image is inverted. Place a bug box lens near the pinhole, the image remains inverted. Move the bug box away from the pinhole toward the bulb, the inverted image becomes blurry and then re-appears not inverted when the bug box is far enough away from the pinhole.
So, whether an image is inverted once or twice depends on the relative placement of the pinhole and the lens.
Ray Tracing
Light ray tracing shows how the pin is inverted or not in the eye.
|
|
|
22 May 2000 |