String Theory
The straight-line path of light through a pinhole can be modeled using strings.

Material
String, optional string in two colors
3 pieces of cardboard
6 Large Binder clips
Assembly
Cut a hole big enough for several pieces of string to fit through at the same time through one of the pieces of cardboard.
Clip two binder clips to the bottom of each piece of cardboard to hold it vertical.
Place the cardboard pieces 50 cm apart from each other on a table top, The cardboard with the hole should be in the center. All of the cardboard pieces should be parallel to each other.
Draw a vertical arrow pointing up, at least 10 cm high, centered on one piece of cardboard.
Cut a hole big enough for 1 piece of string at the base of the arrow and also at the tip of the arrow.
The cardboard with the arrow drawn on it is the object, the cardboard with the hole in its center is the pinhole and the blank piece of cardboard is the screen.
To Do and Notice
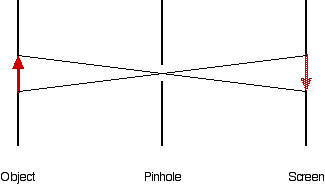
Pull a string trough the hole at the tip of the arrow, then pass the string through the hole in the central cardboard, and then keeping the string straight see where it hits the third piece of cardboard. This is where the image of the tip of the arrow will be created.
Pull a string trough the hole at the base of the arrow, then pass the string through the hole in the central cardboard, and then keeping the string straight see where it hits the third piece of cardboard. This is where the image of the base of the arrow will be created.
What's Going On?
Light travels out from each point in an object in straight lines in all directions.
A stretched string is also an approximation to a straight line.
Thus the stretched string can be used to model the path of light rays in a pinhole image apparatus.
The pinhole makes the light from one point on the object go to one point on the image.
The tip of the arrow is at the bottom of the image, the base is at the top. The image is inverted.
Now tip the cardboard with the arrow on its side so the arrow points to the east. Repeat the above experiment and see that the image points to the west. The image is said to be perverted.
Math Root
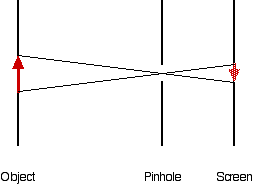
Keep the distance of the object and the pinhole at 50 cm. Mount the screen 25 cm from the pinhole. Stretch strings from the object through the pinhole to the screen and notice the size of the image.

Change the distance from the pinhole to the screen to 1 m. Once again notice the size of the image.
Notice the similar triangles and show that if ho is the height of the object and hi is the height of the image and do is the distance from the pinhole to the object and di is the distance from the pinhole to the image , then ho/hi = do/di
Etc.
Is the pinhole image real or virtual?
One definition of a real image is that in a real image the light from the object actually passes through the location of the image. By this definition the pinhole image is a real image.
In a virtual image the brain of the observer imagines that the image is located in a place where the light from each point on the object does not pass through the corresponding point on the image.
|
Scientific Explorations with Paul Doherty |
|
29 June 2007 |