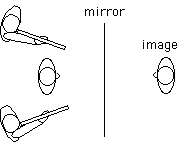
Image Finding in a Mirror
Where am I ?
Introduction
Look in a mirror.
Where is the image located?
Is it on the surface? Or is it as far behind the mirror as you are in
front?
Here are a few experiments you can do to isolate several of the many
clues your eye-brain system uses to determine the distance to an
object or an image. When you look directly at an object, the visual
clues usually agree with each other and all suggest the same
location. However, for an image a variety of contradictory clues can
suggest different locations for the image. For example, the rule that
near objets obscure far objects suggests that an image must be
located on the surface of a mirror while the different images seen by
our two eyes suggest that the image is as far behind the mirror as
the object that made the image is in front. Different people may thus
perceive an image made by a mirror to be located in different
places.
Material
All of these activities require
Other material will be listed as needed in each part.
Assembly
Find a large mirror, one at school, mounted on a door, or buy a large plastic one from a plastic store (at least 3 feet by 2 feet).
Part 0
To Do and Notice
Look at your image in the mirror. Do you have a strong impression
of where the image is located?
Is the image on the surface of the mirror, or behind it?
Walk toward the mirror and away, keep looking. Look at a friend in
the mirror. The location of the image that you see is a human
perception. Thus some people "see" the image on the surface of the
mirror and others "see" it behind the mirror. Others have no strong
sense of where the image is located.
What's Going On?
To form a perception of the distance to an object or image the eye-brain system uses many clues. For example one very strong clue is that a nearer object blocks our view of a more distant object. This clue is called obscuration. A second clue comes from our binocular vision, we have learned to fuse the two different views of the world presented by our two eyes into one, three-dimensional view. When we look at an object these two clues agree and we have little trouble reaching out to touch the object.
However, for the perception of the location of the image made by a mirror these two clues give conflicting information. Obscuration says that the image cannot be behind the mirror, while the view from our two eyes says that it is. Which perception you have depends on the weight you give to each of these clues.
Thus it is not wrong to "see" the image on the surface of the mirror.
Part 1 Looking from two different places, binocular vision
Material
To Do and Notice
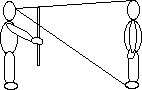
Where is my nose?
Two people look at the nose of the third person. They point toward the tip of the nose with a finger or a meter stick. Then slowly walk toward the nose until they touch it. All the fingers or all the meter sticks come together at one point, the actual tip of the nose. (Some people have an easier time pointing if they close one eye.)
Where is the image of my nose in the mirror?
Now have the same people point at the image of a nose of another person seen in the mirror. Have them walk forward slowly until their fingers or meter sticks hit the mirror. Notice that the fingers or meter sticks hit different points on the mirror. Extend the straight line of each meter stick behind the mirror and they will all come together at one point. When you look at an image in a mirror, your two eyes and brain use the spreading of the light which has bounced off the mirror as one clue to the location of an image, this clue indicates that the image is behind the mirror.
(Optional) You can stretch strings over or under the mirror parallel to the meter sticks and see where the strings come together. This is the location of the image suggested by the view from two different eyes.
What's Going On?
Light travels in straight lines, unless it reflects or refracts. We have experience seeing an object in air and then reaching out and touching the object. Part of this experience uses our two eye view of the object and relies on our experience based on the fact that light travels from the object to each eye in a straight line. Such a view is incorrect when viewing a fish under water. Anyone standing above a stream who has tried to spear a fish underwater will know that you must learn to account for the bending of the light at the surface of the water or you will mis-estimate the location of, and distance to, the fish.
This view is also incorrect when viewing objects in the mirror, light bounces from the surface of the mirror by the law of reflection. (The angle of incidence of the light is equal to the angle of reflection.) The law of reflection makes the light that comes from one point, like a nose tip, located in front of the mirror, bounce off the mirror as if it came from one point behind the mirror.
(Optional) Have people shine flashlight beams at one person's nose. Notice the grand illumination of the nose. Now have them shine their beams on the image nose. Trace the beams using a 3 by 5 card, notice how the beams bounce off the mirror to hit the real nose. The bounce off the mirror follows the law of reflection. Fill the air with chalk dust so that the beams become visible, notice how the beams aimed at the image nose bounce off the mirror to hit the real nose, notice also how the beams appear to travel in straight lines from the people holding the flashlights to the image nose!
Etc
See the non computer activity "Finding Images" for another version of this exploration.
Part 2 Size-Distance
Material
To Do and Notice
Stand back and look at an entire person, head to foot. (Have several people do this while standing at different distances from the the person. ) Hold a meter stick at arms length and measure the distance in centimeters on the ruler spanned by the person from head to the foot. People farther away will see smaller spans than those close to the person. The person is said to subtend an angle, the angle between lines from your eye to their head and from your eye to their feet.

Now do the same measurement for the image of the person in the
mirror.
The image will span a smaller distance because it is further
away.
Measure the distance from the mirror to the person and remember the span of the image in the mirror. Now have the person move until their span measured on your ruler is the same as the remembered span of their image. Notice the distance from from you to the person when they have the same span as their image in the mirror did. For a flat mirror this will be one clue to the distance from you to the image. This clue puts the image behind the mirror.
What's Going On?
One clue used to determine the distance to an image is the angle subtended by an object of a given size. Measuring the span of the object on a ruler held at arms length is a way of measuring this angle. When the same person is farther away they span a smaller angle. The image of a person made by a flat mirror spans a smaller angle than the person. This provides a clue to the distance of an image. This clue indicates that the image is as far behind the mirror as the object is in front of the mirror.
Warning
Lenses and mirrors other than flat mirrors change the size of the image, when this happens size-distance estimates will then give estimates of the location of an image that differ from other clues.
Part 3 Focusing the image, accommodation
Material
To Do and Notice
Look at a nearby person in a camera. Manually focus the camera until they appear sharpest in the camera viewfinder. Read the distance to the person off the distance ring on the camera lens. Look at the image of a person in the mirror with the camera. Once again adjust the camera to bring the image into focus. Read the distance. According to the focus of the camera lens the image is located as far behind the mirror as the person is in front of the mirror.
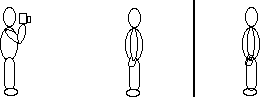
When focused on image in a mirror the camera reads a greater distance.
What's Going On?
A camera makes an in-focus image of an object only when the object is within a range of distances. The camera is focussed by moving the lens toward and away from the film. A scale reads out the distance to the object when it is in focus.
Human eyes also focus on a range of distances. The human eye focuses by changing the focal length of the lens which is inside the eye. The muscles which control the focussing give feedback to the brain which provides another clue to the distance to an object or image.
Part 4 Distance of nearest vision
To Do and Notice
Look at your thumb. Look at the finest details that you can see, the ridges and whorls of your thumbprint. Bring your thumb towards one eye. Notice that at some distance the thumbprint becomes blurred and you can no longer see fine details. This is your distance of nearest vision. You can use your distance of nearest vision to determine the distance to an image made by a lens or mirror, simply move your eye toward the image until it becomes blurry, it is then at your distance of nearest vision.
Hold your thumb about 10 cm from the mirror, move in until your eye is at its distance of nearest vision from your thumb.
Rotate your thumb so that the print is toward the mirror, keep the thumb 10 cm from the mirror. Even though you could not see the thumbprint clearly when viewing it directly, you can see it clearly in the image, the image is beyond your distance of nearest vision.
What's Going On?
The lens in your eye must bulge out to focus on nearby objects. There is a maximum bulge which the lens can achieve and so there is a nearest distance to objects which you can bring into focus. (The lens is focused by an interesting sphincter muscle system. When the muscles contract they relax connectors which normally pull the lens flat. So it takes muscular effort to allow the lens to bulge naturally and so focus on nearby objects. Relaxed muscles allow the lens to be pulled flatter so that it focuses on distant objects.)
So What?
As you get older, your lens gets stiffer and so it is able to bulge less and less. Your distance of nearest vision therefore increases. Youngsters can focus as close as 10 cm. For some older people, their distance of nearest vision is longer than their arms.
Part 5 Resolution, the eye chart
Material
You can make a reverse eyechart by scanning an eyechart into the computer and then reversing it with a drawing program. Or by making a transparency of the eyechart and making a copy of the back side of the transparency. That is, simply flip the transparency over when you copy it.
To Do and Notice
Stand about 6 paces, or 6 meters (18 feet) from an eye chart. Notice which line is the smallest you can read.
Stand about 3 meters from a mirror holding an eye chart which has the letters reversed right-to-left. Look at the image of the eye chart in the mirror. Notice which is the smallest line you can read. Notice you can read the same size letters in both cases.
So What?
Your eye has a smallest detail that it can see at a distance of 6 meters. At closer distances it can resolve smaller letters. Since you can resolve the same letters on a reverse eye chart when it is 6 meters from you and when you and it are 3 meters from a mirror, then the image in the mirror must be about 6 meters from you, or 3 meters behind the mirror.
Part 6 Touch the image, parallax
Material
To Do and Notice
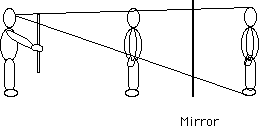
One person holds the meterstick sticking straight out above his head while standing about 2 meters in front of the mirror. The optional red side of this meter stick is turned toward the mirror so it appears red in reflection.
A second person stands about 1 to 3 meters behind the mirror holding a second meterstick overhead. (This meterstick will be fixed in place for the duration of this activity so it can be mounted in place to a wall or other piece of furniture. Face the optional red side of this meter stick toward the observers.)
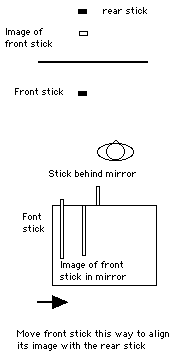
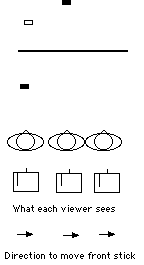
Two, or more, people stand farther from the mirror than the meter stick holder. They should spread out in an arc. They compare the location of the image of the meter stick (red) and the real meterstick behind the mirror (red).
Each person points his or her hand giving instructions to the person in front of the mirror how to move to make the image of the held meterstick line up with the real meterstick behind the mirror.
They point their fingers right, ->, if the meterstick holder is to move right from their point of view, or left, <-, or, if the two sticks line up, they make a fist, |.
The person holding the meterstick watches the instructions given by the crowd.
If he sees a pattern of hands like this -> -> ->, or like this <- <- <-, he should move in the direction of the fingers.
If he sees -> | <-. he should move away from the mirror.
If he sees <- | -> he should move toward the mirror.
When he sees | | |, then everyone agrees that the image of the meterstick lines up with the real meterstick behind the mirror.

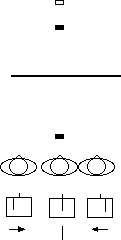
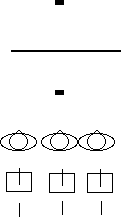
Too close Too far Just right
What's Going On?
Light from the meterstick in front of the mirror bounces off the mirror according to the law of reflection, it then travels along the same straight lines as light from a real meterstick held behind the mirror. If the image of the meterstick is at the same distance behind the mirror as the real meterstick, and aligned correctly right-to-left then everyone will agree that the two metersticks are aligned. However, at other distances some people will think the image of the meterstick is aligned with the real meterstick while others will think they are not.
So What ?
This is one of the ways to locate the image produced by a mirror, lens or hologram. ("The" image location according to physicists.) When everyone agrees that an object lines up with an image then the object and image are at the same location.
Etc.
This works better if you paint the sticks red on one side and black on the other. Place the red side of the meterstick behind the mirror toward the viewers, and the red side of the meterstick in front of the mirror. The viewers will see the reflected red backside of the front meterstick. Ask them to give directions to align the red sticks. This helps eliminate the common problem of people giving instructions on how to align the real sticks and not the image of the front stick with the real back stick.
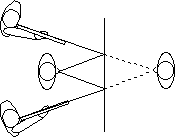
Part 7 Convergence
Material
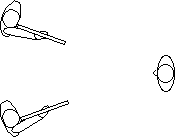
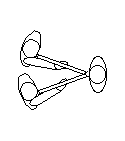
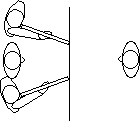
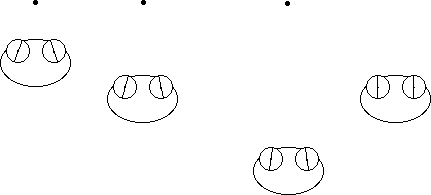
The two-eye view model
Duplicate the following figure, use heavy paper stock, or glue the copy to manila folder material. Cut out the eyes. Mount the eyes in the head. Use a grommet or thumb tack in the center of each eye so that it can rotate.
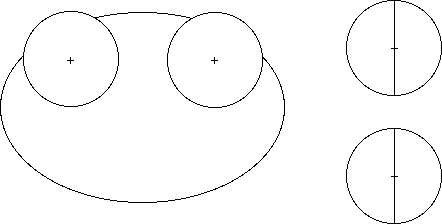
To Do and Notice
Place an object in front of the face. Rotate each eye so that the image of the object falls on the center of the rear of the eye, on the fovea. The object must lie on the center line shown for each eye. Move the object close to the eyes and farther away. Notice that the eyes converge strongly for nearby objects and that the lines become nearly parallel for distant objects. For an object the lines never diverge.
What's Going On?
Convergence of the eyes is controlled by muscles. The action of these muscles provides information which the brain can use as a clue when assigning a distance to an object.
Etc
Dr. Susan Allen showed me this activity.
Return to Summer Institute main page
|
Scientific Explorations with Paul Doherty |
|
23 May 2000 |